DIY Minor Paint Repairs to Cover Rust Spots Appearing
To tackle DIY minor paint repairs for rust spots, first assess the corrosion and safety needs, then prep the surface by cleaning and removing loose material. Remove loose rust, lightly sand to create a sound edge, and wipe clean. Choose a metal-specific primer (prefer epoxy or zinc-rich) and apply evenly. Use a durable topcoat matched to exposure, blending edges to match surrounding areas. Proper curing and maintenance follow; continue on to master the full, durable fix.
Assessing Rust Spots and Safety Precautions
Evaluating rust spots begins with a careful inspection to determine extent and severity. You’ll classify rust types by corrosion depth and surface area, noting whether pitting, flaking, or bubbling dominates. Begin with good lighting and a clean surface to avoid misreadings. Wear safety gear—gloves, eye protection, and a dusk mask or respirator—since corrosion products and solvents can irritate skin and lungs. Document locations, sizes, and patterns to guide repair decisions and future prevention. Use a simple gauge or coin test to estimate thickness by feel and edge integrity, but don’t rely on color alone. If coatings are intact and rust remains superficial, plan minimal intervention; deeper corrosion requires more robust steps. Maintain ventilation when using solvents or rust converters. Keep a written checklist for each spot: hazard level, required tools, and safety measures. Your aim is a precise assessment that informs a safe, effective repair path without overcommitting resources.
Prepping the Surface for Repair
Start with thorough surface cleaning to remove dirt, grease, and stearics that can hinder adhesion. Assess rust spots and damage, then address loose material before sanding; use appropriate grits to create a uniform profile. Confirm you document the cleaning, rust assessment, and sanding prep steps for reliable repair results.
Surface Cleaning Basics
Before you repair any paint, you must clean the surface thoroughly to remove dust, oils, wax, and contaminants that can hinder adhesion. Surface cleaning basics focus on preparing a solid bond for repair. Use deliberate, controlled motions and verify cleanliness before sanding or priming.
| Technique | Result |
|---|---|
| Surface cleaning techniques | Guarantees proper adhesion and even finish |
| Cleaning product options | Provides safe, effective removal of contaminants |
Choose approved cleaners and test a small area first. Rinse thoroughly to prevent residue that can compromise coating. Wear gloves and work in a well-ventilated space. For stubborn grime, repeat once and inspect under lighting. Dry times must be respected before proceeding. Document any reactions or finish changes in your notes for future touch-ups. This routine keeps coatings durable and flexible, aligning with a freedom-loving approach to maintenance without compromising performance.
Rust Spot Assessment
Rust spots signal compromised substrate and must be assessed before repair. You’ll determine if rust is surface or penetrating, then classify severity to guide prep. Begin with rust identification techniques: scratch test in inconspicuous areas, magnet pull for flaky iron oxide, and simple probe to detect loose edges. If contamination exceeds 1–2 mm or shows underlayer corrosion, plan deeper treatment or replacement. Next, consider rust prevention methods to curb recurrence: isolate moisture source, apply rust-inhibiting primer, and seal joints to block ingress. Use synchronized steps to keep the surface dry during inspection and repair. Documents and photos help track progression and future touch-ups.
- Rust identification techniques
- Diagnostic criteria and moisture control
- Rust prevention methods
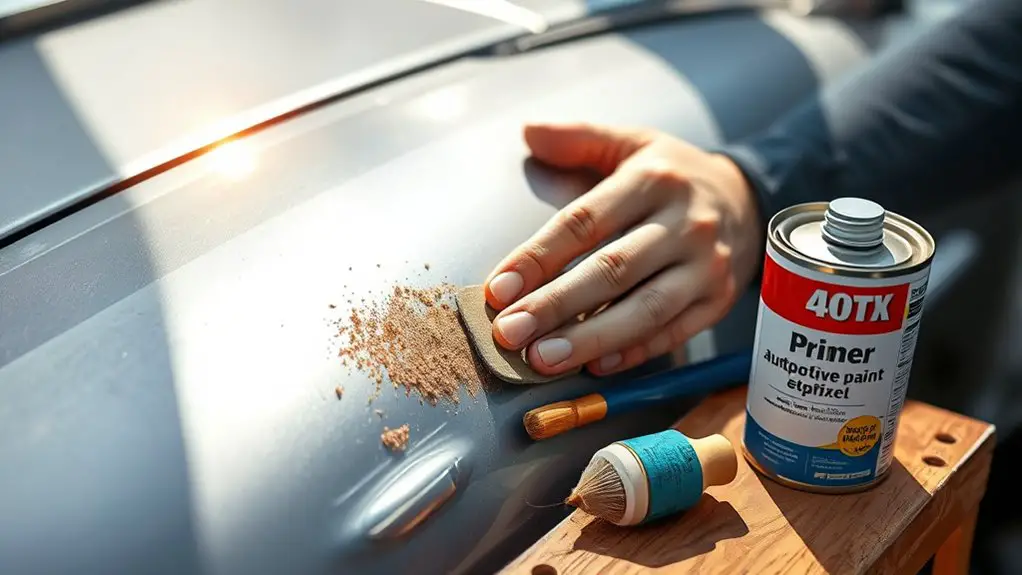
Sanding Preparation Steps
Sanding preparation is the essential first step to guarantee a clean, uniform repair. You’ll establish a true working surface by removing loose rust, flaking primer, and glossy coatings. Begin with a light scuff using 120–150 grit sanding techniques to map high spots without deep gouges. Move to finer grits, 180–220, to create a uniform feathered edge around the affected area. Use sanding tools that suit the substrate—manual blocks for flat panels, detail sticks for corners, and a random-orbit sander for larger expanses. Keep the surface dry and free of dust between passes. Wipe with mineral spirits or corresponding cleaner, then inspect for remaining blemishes. If any pits appear, address them before applying primer to guarantee peak adhesion and a durable finish.
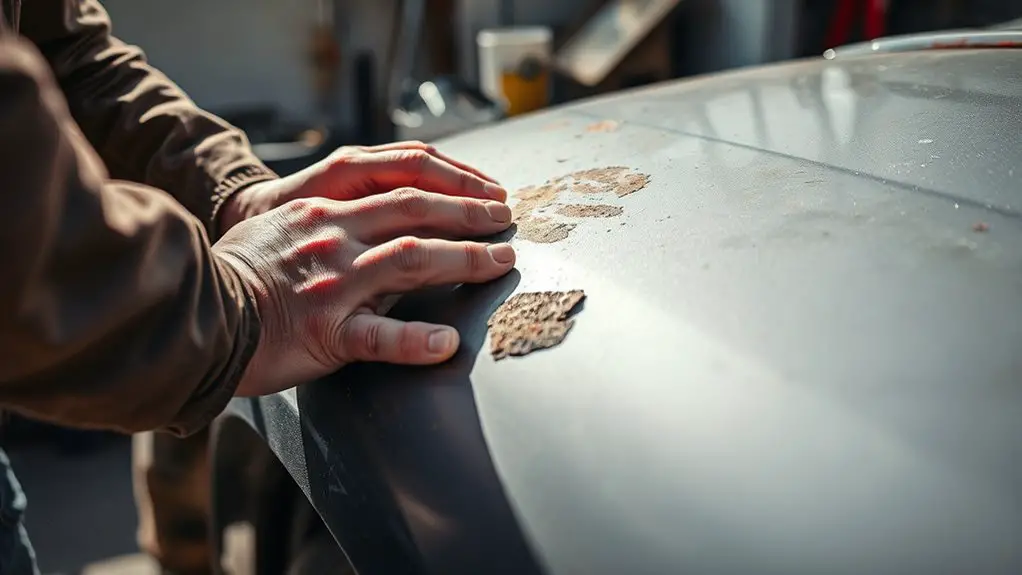
Removing Loose Rust and Flaking Paint

When removing loose rust and flaking paint, start by inspecting the affected area to determine extent and underlying substrate condition. You’ll want a precise assessment to guide subsequent steps and guarantee lasting results. Focus on rust treatment and paint adhesion potential as you plan removal, avoiding oversights that weaken the repair.
When removing loose rust, inspect the area to gauge extent and substrate health for lasting results.
- Identify loose material and boundaries: mark edges, confirm whether rust penetrates deeply or stays surface‑level.
- Choose removal method: mechanical scraping and limited grinding prefer controlled, minimal heat and dust.
- Test adhesion after roughing: probe with a screwdriver or blade to verify that remaining layers resist lift and that the substrate remains sound.
Keep tools sharp and steady, maintain a clean edge, and prevent contamination from oils or water. Your goal is solid scaffold preparation, enabling reliable rust treatment and predictable paint adhesion, without introducing unnecessary damage or flare‑ups. This stage sets the foundation for durable coverage.
Choosing the Right Primer for Metal Surfaces
When selecting a primer for metal, match the type to your substrate and exposure—epoxy, zinc-rich, or bonding primers each offer different adhesion and corrosion resistance. Prioritize primers that enhance adhesion to bare metal, inhibit rust, and provide a solid base for the topcoat, paying attention to surface preparation and cure times. Consider how each option supports metal prep, including rust prevention, coating compatibility, and film thickness needed for durable protection.
Primer Types for Metal
Choosing the right primer for metal surfaces is essential to prevent corrosion, promote adhesion, and guarantee a durable finish. In this section, you’ll learn practical primer types and how they fit metal prep needs. Be precise about the environment, substrate, and future coating compatibility. Below are options that balance performance with workability.
1) Epoxy primers: robust adhesion, corrosion resistance, and good topcoat compatibility for ferrous and nonferrous metals.
2) Zinc-rich primers: sacrificial protection, ideal for edge areas, welds, and damaged coatings; require proper curing.
3) Polyurethane primers: fast setup, weather resistance, and durable film for exposed outdoor metal.
Choose based on exposure, moisture, and repair scope, ensuring surface is clean and dry before application.
Adhesion and Rust Prevention
Adhesion and rust prevention hinge on selecting a primer that bonds reliably to the substrate and forms a protective barrier against moisture and oxygen. You’ll prioritize profile compatibility with metal, rust prevention chemistry, and surface cleanliness. Choose primers offering strong adhesion techniques such as zinc-rich, epoxy, or ETCHR formulations when appropriate for your metal type. For bare iron or steel, zinc primers provide sacrificial protection; for aluminum, use passivating or special bonding agents. Ascertain the surface is free of oils, dust, and loose rust before application. Consider primer film thickness, cure time, and recoat window to maintain continuous barrier integrity. Evaluate rust inhibitors embedded in the coating to extend service life, especially in high-humidity environments or outdoor exposure.
Application in Metal Prep
To select the right primer for metal surfaces, you must match the coating’s chemistry to the substrate and environmental exposure. Primer choice affects metal surface preparation, paint adhesion, and long-term rust control. Use dedicated metal primers when corrosion risk is high, and consider zinc-rich or adhesion-promoting options for clean, bare steel. Confirm compatibility with topcoat chemistry and service temperature. Surface flaws, including rust pits, should be primed after proper decontamination and rust removal.
- Match primer chemistry to substrate and topcoat to maximize paint adhesion and corrosion resistance.
- Prioritize zinc-rich or epoxy primers for active rust, with proper curing and moisture resistance.
- Verify compatibility, recoat windows, and environmental exposure to maintain film integrity and long-term protection.
Selecting Paint and Finishes for Durability
Selecting paint and finishes that resist wear, moisture, and UV exposure is essential for durable DIY repairs; start by matching the coating system to the surface, environment, and anticipated use. You’ll choose a system that forms a cohesive barrier, with compatible primers, paints, and topcoats. Assess substrate chemistry, corrosion risk, and substrate porosity to determine film thickness and adhesion requirements. Prioritize durable finishes designed for the item’s service life, such as metal-specific paints with rust inhibitors and UV-stable pigments for exterior exposure. For interior metals, consider lower-VOC options that still provide abrasion resistance. Confirm compatibility with existing coatings and cleanup methods to avoid delamination. In paint selection, favor two-component or high-build formulations when applicable, ensuring proper curing and film formation. Document a simple specification for color, gloss, and impact resistance to guide future touchups. This disciplined approach yields reliable durability without sacrificing freedom of choice.
Applying Primer, Paint, and Topcoat
With the right groundwork from selecting a compatible coating system, you’ll apply primer, paint, and topcoat in a controlled sequence to assure adhesion and durability. You’ll follow precise steps to guarantee long-lasting coverage and a smooth finish, avoiding uneven texture and peeling. Prioritize surface cleanliness, rust inhibitor compatibility, and proper dwell times between coats.
1) Primer application techniques: choose the correct primer type for metal, apply evenly, maintain tack-free surfaces before the next coat, and respect curing times to prevent blistering.
2) Paint application: select a compatible topcoat, apply via smooth strokes, use appropriate thinning if required, and maintain uniform film thickness to avoid runs.
3) Topcoat finishing options: consider gloss, satin, or matte sheens based on environment and load, then cure under controlled temperature and humidity for ideal durability.
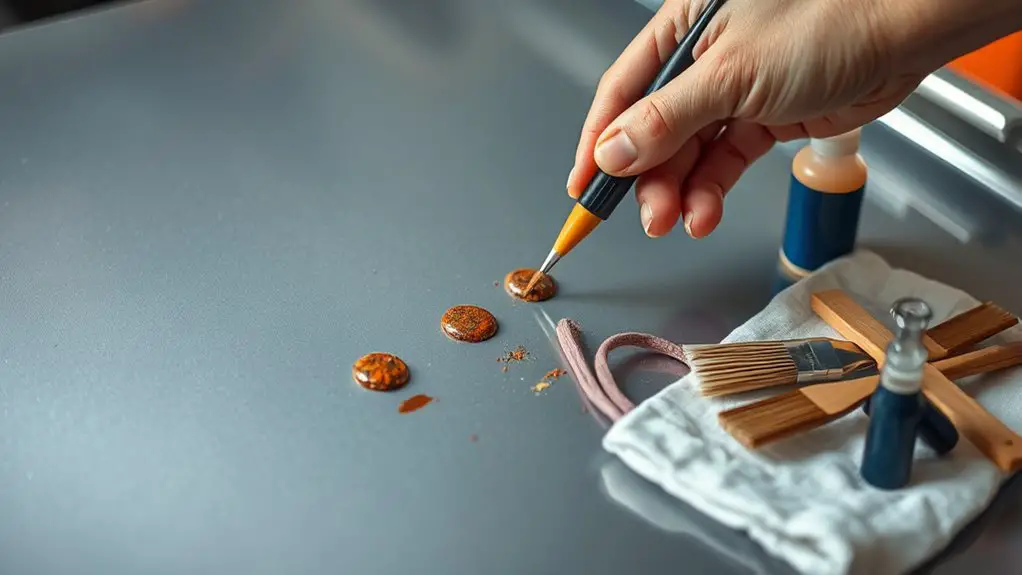
Blending the Repair With Surrounding Areas
Blending the repair with surrounding areas requires careful control of color, texture, and edge change so the repair becomes virtually indistinguishable. You start by evaluating the finish, then select a matching base color and adjust with tinting of the topcoat if needed. Use color matching techniques to compare under lighting conditions similar to the actual environment, recording readings for future reference. Apply a fine, feathered edge to the repair to avoid hard boundaries; this is where blending methods matter most. Build color in thin, even passes, gradually approaching the surrounding shade while watching for hue drift and saturation changes. Texture must mirror the adjacent surface, so lightly scuff or dust the fresh layer to integrate it. Control gloss level to match the existing sheen; a slight buff after cure can help. Recheck under normal light, adjusting as necessary, ensuring the restored area remains seamless and durable.
Curing, Maintenance, and Troubleshooting
Curing, maintenance, and troubleshooting follow once the blended repair has been established, ensuring durability and consistent appearance over time. You’ll implement targeted curing methods to maximize film hardness and adhesion, then verify color match under ambient lighting. After curing, adopt concise maintenance tips to prevent re-rusting and preserve finish integrity.
1) Monitor film hardness and cure progress at recommended intervals, adjusting ventilation and temperature as needed to avoid pinholes or cracking.
2) Schedule periodic inspections for gloss, adhesion, and rust reappearance, touching up only with compatible paint and minimizing feathering to maintain uniform texture.
3) Troubleshoot discrepancies immediately: if peeling or mismatch occurs, reassess substrate moisture, re-clean edges, and re-apply a thin, compatible topcoat rather than overbuilding.
Frequently Asked Questions
How Often Should I Recheck for New Rust After Repair?
You should recheck for new rust every 6 to 12 months after repair. Use rust inspection frequency as a baseline, but adjust for climate, moisture exposure, and coating quality. Perform visual checks monthly and use rust detection methods like magnetic pull tests or simple spark tests to catch early corrosion. If you see any discoloration or bubbling, inspect closely and reseal promptly. Stay vigilant, maintain coatings, and document all findings for continuous protection.
Can DIY Rust Repairs Affect Vehicle Warranty?
DIY rust repairs can affect warranty coverage, but it depends on your automaker’s terms. Some manufacturers require professional service and documented parts; improper DIY can void related corrosion or paint warranties. Start with a thorough assessment, then follow the repair process precisely, using OEM-approved materials. A strong stat: untreated rust can reduce vehicle value by up to 15%. Warranty implications hinge on proper remediation, non-damaging prep, and timely, product-specific steps to avoid exclusions.
What Environmental Conditions Hinder Drying Times?
High humidity levels and temperature fluctuations slow drying times. You’ll notice humidity levels above 50% extend cure times and can cause tackiness. Temperature swings—from cool mornings to hot afternoons—force moisture loss unevenly, risking gloss loss or cracking. Keep ambient temps steady, ideally around 20–25°C (68–77°F), with good ventilation. Shield treated areas from rapid cooling or heat spikes, and avoid painting in damp environments. Patience now prevents failures later.
Are There Budget-Friendly Rust Repair Alternatives?
Budget-friendly rust repair options exist. You can start with budget options like rust converters, epoxy putties, and rust-inhibiting primers, then top with a compatible paint. For fast, durable results, choose rust treatment products that bond to metal and seal against moisture. Expect longer life if you prep thoroughly: remove loose rust, clean and dry surfaces, and follow manufacturer directions. These cost-effective steps let you repair, protect, and keep your project moving.
How Can I Prevent Rust Recurrence After Finishing?
To prevent rust recurrence after finishing, you’ll need proper rust proofing techniques and disciplined long term maintenance. Start with a sealed, rust-inhibiting topcoat and regular inspections for new spots. Prioritize moisture control, touch up any chips promptly, and apply protective coatings after washing. Maintain ventilation during curing, and reapply every few years as needed. You’ll stay ahead by documenting wear, scheduling seasonal checks, and adopting a proactive, no-nonsense approach to long term maintenance.