
DIY: Repairing Rattles and Loose Trim Without Damage
Begin by listening closely and isolating the rattle by region—test seams, joints, and edges, then gently shake or flex panels to spot looseness. Choose lightweight fasteners or low-viscosity adhesives suited to delicate surfaces, and always test on a hidden spot first. Use clean, organized work areas, protective gear, and non-damaging tools. For quick wins, tighten hinges, shim misaligned doors, and apply tiny adhesive beads to cracks. With simple steps, you’ll reduce noise and keep trim intact; more tips follow.
Identifying the Source of the Rattle and Loose Trim

To identify the source of a rattle or loose trim, start by listening closely as you move and tap different parts of the area. You’ll want a careful, methodical approach: isolate sounds by region, then test with light pressure. Begin at seams, joints, and edges where panels meet the frame. If a metal piece rattles, gently shake or flex it to reveal looseness or a hidden fastener. For plastic or wood, press along trim types and mounting points to feel for play or shifting. Note whether the sound changes with movement, temperature, or vibration. Compare behavior between doors, dashboards, panels, and interior moldings. Document patterns, then recheck suspected spots with repeated taps. This process helps you map rattle sources without guessing. Clear notes guide your next steps, ensuring you address the right areas efficiently, reducing trial-and-error. You’re documenting rattle sources and trim types for precise fixes.
Choosing the Right Fasteners and Adhesives for Delicate Surfaces
When choosing fasteners and adhesives for delicate surfaces, start by matching the material and load requirements to prevent damage. You want reliability without marring, so pick options that suit the substrate’s hardness and flexibility. Consider adhesive properties first: bond strength, cure time, gap filling, and creep resistance. For thin trim or veneer, choose low-viscosity adhesives that wick evenly but don’t seep outward. For fasteners, opt for small-diameter pins, finishing nails, or micro screws with corrosion resistance and minimal protrusion. If you’re working with soft woods or plastics, avoid metal that can corrode or crush the surface; nylon or brass alternatives are kinder to detail. Test a tiny patch first to observe creep and finish compatibility. Document your choices: adhesive properties, curing conditions, and load expectations. Align fastener types with the surface profile, predrill where needed, and guarantee even seating. Your goal is a secure hold that remains discreet and damage-free.
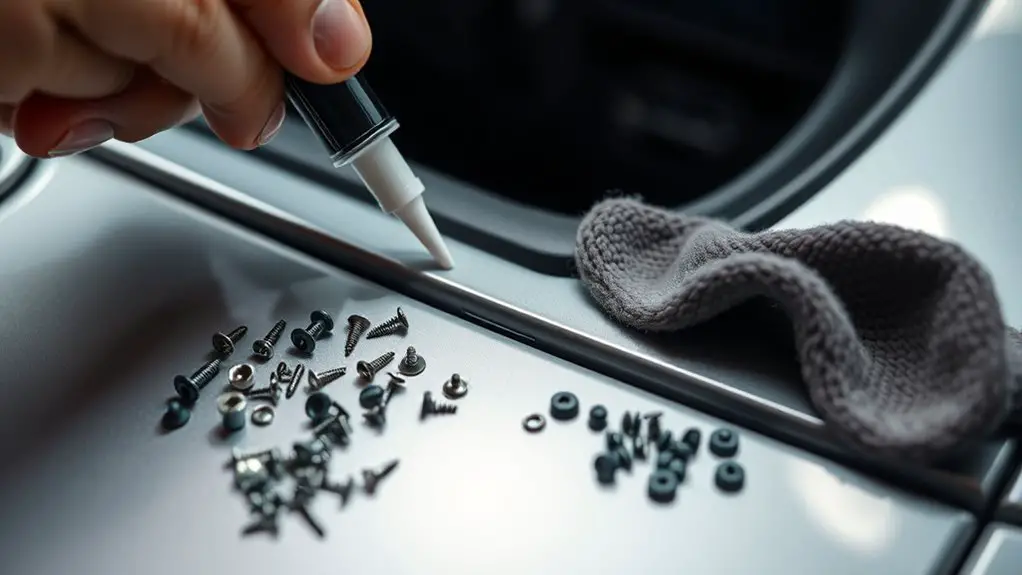
Safe, Non-Damaging Preparation and Application Techniques

Before you start repairing, set up a clean, organized workspace and protect nearby surfaces. You’ll want a clear bench, good lighting, and a drop cloth or scrap cardboard to catch dust and small debris. Start with safety precautions: wear eye protection, gloves, and a mask if you’re sanding or working with solvents. Keep children and pets away, and unplug power tools when not in use. Tool selection matters: choose non-slip clamps, a precision knife, soft-tipped brushes, and a non-marking scraper. Use low-lume setting for delicate surfaces to avoid glare and mistakes. Plan your approach with minimal invasiveness—test on an inconspicuous spot first. Wipe surfaces with a damp cloth to remove dust before applying anything; let dry completely. When you apply filler, adhesive, or sealant, use thin, controlled layers and let each cure fully. Document you steps, and clean tools promptly to preserve their effectiveness and prevent residue transfer.
Quick Fixes for Common Areas: Cabinets, Doors, and Windows
If you’re tackling cabinets, doors, and windows, start with a quick assessment to identify loose trim, gaps, or rattles and prioritize fixes that prevent further damage. For cabinets, inspect cabinet hinges and tighten screws with a driver; if a hinge is loose, use a shim behind the hinge plate or switch to longer screws to spread the load. Check door frames for misalignment; a shimming card or thin piece of cardstock between the frame and hinge edge can stop rubbing and reduce movement. Gaps between doors or windows? Use weatherstripping or thin felt pads to dampen impact and seal drafts without adding bulk. Apply a lightweight adhesive bead sparingly to tiny cracks, then press surfaces together and wipe away excess. Avoid over-tightening, which invites stress cracks. Keep fasteners organized, and test function after each adjustment. Your space gains quiet and confidence, with fixes that feel deliberate and durable.
Maintenance Tips to Prevent Future Loosening and Noise
Keeping things tight now helps prevent future rattles and looseness. You’ll extend the life of trims by adopting a simple routine of preventive maintenance that fits your pace. Start with a quick inspection after big weather shifts, listening for new creaks and feeling for slight movement. Tackle loose screws and nail heads before they travel; replace worn fasteners with stainless or coated options to resist corrosion. Use a quality sealant or adhesive in joints that see vibration to aid noise reduction and stay flexible. Lubricate metal-on-metal contact points lightly to soften squeaks without attracting dust. Practice mindful mounting: align parts evenly, avoid overtightening, and test under typical loads to catch issues early.
Keep trims tight with seasonal checks, quality fasteners, and light lubrication to prevent rattles and wear.
- Schedule brief, seasonal checks for screws, nails, and trim gaps
- Use appropriate sealants for vibration-prone joints
- Replace worn hardware to maintain alignment and prevent movement
- Apply light lubrication only where needed to reduce noise and friction
Frequently Asked Questions
How Can I Distinguish Between Rattles From Wood, Metal, or Plastic Components?
You can distinguish rattles by listening and feeling: wood usually sounds warm and organic with a hollow thud; metal rings, clangs, or a crisp tingle when tapped; plastic tends to be sharp, quick, and less resonant. Check texture and weight—wood is grainy, metal heavy, plastic light. Inspect seams and finishes for clues, and gently tap to hear different responses. Note rattle sources, material identification, and how each component vibrates to home in on the culprit.
What Temporary Fixes Won’t Void Warranty or Cause Future Damage?
Satire kicks in: you don’t want to void your trust fund of a warranty. For temporary fixes, use non-permanent patches or painter’s tape, light dab of adhesive if allowed, and soft cushioning that’s removable. Avoid rigid fasteners, drilling, or harsh solvents. Check warranty considerations first, keep receipts, and document every step. If you must, consult the manual or manufacturer. You’ll gain time, avoid risk, and keep options open for proper repair later.
Can Humidity or Temperature Changes Worsen Loose Trim Issues?
Yes, humidity effects and temperature fluctuations can worsen loose trim. When humidity rises, wood and adhesives expand, shifting gaps; when it drops, they contract, stressing joints. You’ll notice more rattling as seasons change. To counter this, seal exposed edges, use flexible caulk or weatherstripping, and keep interiors within a stable range. Inspect fasteners regularly, reattach loose trim promptly, and avoid abrupt temperature swings to minimize further movement.
Are There Safe Non-Adhesive Methods for Stubborn Creaks?
If you want safe non-adhesive fixes for stubborn creaks, yes—try sound dampening and friction reduction techniques. Start by gently oiling joints with a small amount of white lithium or graphite, then work it in to silence loose trim. Use shims or felt pads to dampen movement, and reseat parts to prevent rubbing. Repeat as needed, testing each adjustment; and remember, patience is your best tool for friction reduction.
How Can I Test the Strength of a Repair Without Loosening It Later?
Yes. To test strength without loosening it later, perform a controlled repair test: apply gradual, modest forces in several directions, noting any movement. Use a simple pull, push, and twist sequence, stopping at first signs of strain. Record results for each joint as part of your repair testing and note any creep. For accuracy, compare to baseline specs or previous fixtures. This strength evaluation guides you to adjust tension or adhesive methods accordingly.