
How to Stop Parasitic Starter Solenoid Failure Draining Your Battery
You can stop parasitic starter solenoid drain by diagnosing the coil and wiring, isolating the parasitic path, and restoring clean connections and proper fusing with precise, methodical steps. Start by measuring resting voltage and actual draw, then inspect the solenoid coil resistance, terminals, and wiring for corrosion or arcing. Isolate loads, verify fuse behavior, and reseat or replace the solenoid connections. With clean grounds and OEM-grade parts, you’ll curb the drain—and there’s more to learn afterward.
Identifying the Symptoms of a Parasitic Starter Solenoid
When a parasitic starter solenoid drains power even when the engine isn’t cranking, you’ll notice the battery voltage dropping more quickly than expected. Symptom awareness is your first diagnostic tool. Look for persistent parasitic draw, especially after key-off, that isn’t explained by accessories. Common indicators include a sluggish crank, dim headlights, and a battery that recovers slowly after starting attempts. You might hear a faint click or click-pause from the solenoid even with the ignition off. With the engine not turning, voltage readings at the battery can show continuous current flow when it should be near zero. Document timing, duration, and any correlating electrical events. Solenoid diagnostics prioritize measuring actual current draw, battery voltage, and wiring integrity. Isolate the solenoid circuit by disconnecting the control wire and checking whether the draw persists. If the draw stops, you’ve pinpointed the culprit; if not, broaden your inspection to related starter circuitry. Maintain precise records to guide effective repairs.
Understanding How a Parasitic Drain Affects Your Battery
A parasitic drain steals current even when the engine is off, so you’ll want to understand the battery drain mechanics and how small loads add up. Distinguish between a true parasite and declining battery health, since symptoms can look similar but causes differ. We’ll also outline how to diagnose a persistent drain and set the stage for targeted fixes.
Battery Drain Mechanics
Parasitic drain is the steady, undesired draw on your battery after the engine is off, caused by components that remain powered or wiring that leaks current. You’ll see how leakage paths and component idle states create a continuous load, which must be met by the battery’s capacity. Understanding battery chemistry and electrical resistance helps you predict how long a drain can run before voltage sag or parasitic failure occurs. By quantifying resistance paths and draw, you can identify weak links in the circuit and optimize shutoff behavior.
- Battery chemistry implications: state of charge, self-discharge rates, and chemistry-specific parasitics
- Electrical resistance paths: high-resistance leaks vs. solid shorts
- Relays, modules, and ECUs: built-in standby current
- Fusing and wake-up events: how design choices affect night loads
Parasite vs. Battery Health
Parasite-induced battery drain and overall battery health are tightly linked: a persistent draw can mask or accelerate capacity loss, while a healthier battery resists voltage sag longer under the same load. You’ll see that parasitic loads shift the boundary between usable capacity and resting voltage, effectively compressing the battery’s usable life. In practical terms, battery maintenance becomes a control knob for reliability: healthier cells tolerate brief spikes in load, while degraded cells reveal weakness sooner through deeper voltage drops. Understanding this relationship helps you prioritize electrical systems checks, ensuring cables, fuses, and modules aren’t leaking current. You gain freedom by targeting efficiency: reduce parasitics, preserve cranking reserve, and maintain predictable performance under varied operating conditions.
Diagnosing Persistent Drain
Diagnosing a persistent drain starts with measuring the baseline: you must determine the resting battery voltage and actual current draw when the vehicle is off, then compare these values to spec. You’ll identify parasitic causes by tracking when drain symptoms appear and how long they persist after ignition off. Precision matters: isolate circuits, verify fuse behavior, and confirm battery health to avoid false positives. Use objective measurements, not impressions, to map the path of current flow. This approach prevents guesswork and defines actionable steps toward freedom from surprise starts.
- Baseline resting voltage and draw
- Time to stabilize after shutdown
- Circuit and fuse correlation with symptoms
- Battery health versus parasitic contributions
Tools and Safety Precautions for Working on Electrical Systems

Working with electrical systems requires strict adherence to safety protocols and the right tools. You’ll prioritize demolition-free environments, systematic isolation, and clear risk assessment before touching any component. Start by identifying power sources and removing them using lockout/tagout procedures, then verify no residual energy remains with a properly rated tester. When selecting tools, rely on electrical tools rated for the voltage and current you’ll encounter, insulated handles, and non-sparking hardware for ignition-risk areas. Keep a calibrated multimeter, a verified continuity tester, and a digital clamp meter on hand to measure circuits without live exposure. Wear safety gear designed for electrical work: flame-resistant gloves, arc-rated clothing, eye protection, and a hard hat as needed. Maintain clean work surfaces, organize cables to prevent accidental contact, and label every connection. Follow manufacturer instructions for each device, and never bypass protective features. Finally, document procedures and review safety steps with your team before any diagnostic or repair activity.
Quick Checks to Confirm a Parasitic Draw
You’ll start by performing quick load testing to identify abnormal battery draw and confirm whether the system remains energized after key-off. Look for battery drain indicators in the meter readings and correlate them with parasitic loads to narrow the suspect circuits. When unsure, follow safe disconnection steps to isolate suspected components without overshooting diagnostic accuracy.
Quick Load Testing
To verify a parasitic draw quickly, perform a baseline load test with the engine off and all accessories in their usual state, ensuring the battery is fully charged before you start.
- Measure resting voltage and note any deviation from spec
- Disable all nonessential circuits and recheck battery health indicators
- Apply a controlled load and monitor voltage drop over 15–30 seconds
- Compare results to manufacturer tolerances and log any excess draw
Keep test conditions consistent: same ambient temperature, battery state, and starter interlocks. If the load test shows abnormal draw, isolate circuits one by one to pinpoint contributing modules. Document findings for service records. Use precise measurements and reference values to decide next steps, ensuring you maintain battery health while preventing parasitic drains from escalating.
Battery Drain Indicators
Battery drain indicators are the quick checks that confirm a parasitic draw before you start pinpointing the culprit. You’ll assess current flow patterns with a multimeter on the 12V circuit, looking for sudden deviations when everything should be idle. Measure resting voltage, note any abnormal fluctuations, and verify that the alternator isn’t feeding charge post-crank. Inspect your battery health by comparing voltage under load and without; a sag indicates inefficiency or aging chemistries. Correlate indicators to electrical components that routinely hold residual current—alarms, clocks,USB hubs, or security modules. Document the draw in milliamp-hours and cross-check against spec sheets for your model. If readings exceed expected ranges, you’ve narrowed the field to plausible culprits without unnecessary disassembly. Maintain strict caution with live circuits.
Safe Disconnection Steps
Safely confirming a parasitic draw starts with quick, controlled disconnections to isolate the culprit without risking damage. You’ll follow a disciplined sequence that preserves safety and credibility, using proven disconnection techniques and strict safety measures.
- Identify the suspect circuit with a multimeter, then isolate via a safe power disconnect.
- Remove loads one at a time, verifying behavior changes before continuing.
- Ground yourself and wear insulating gloves during any exposed contact handling.
- Recheck battery voltage after each step to confirm reduction in draw without introducing new faults.
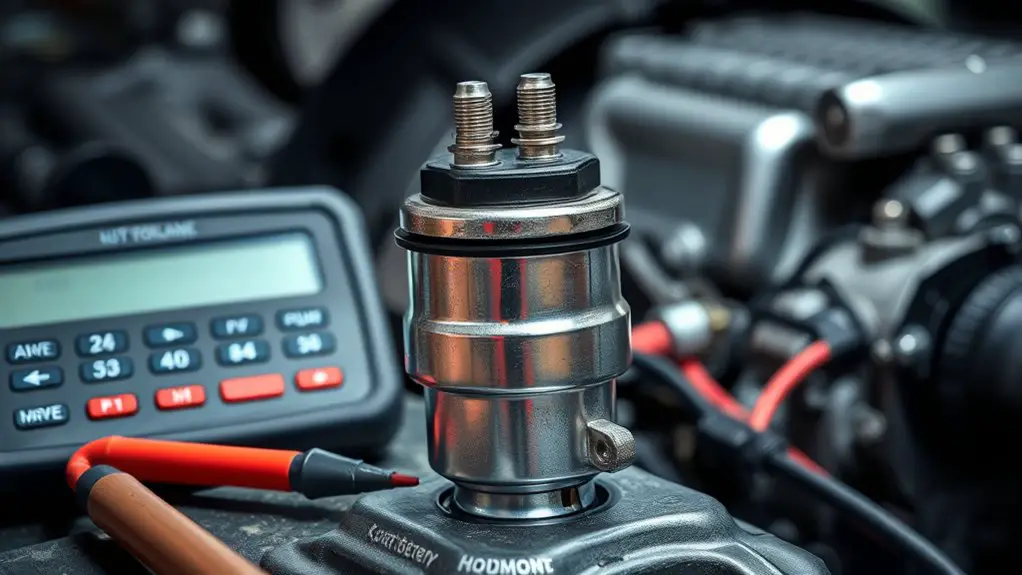
Inspecting the Starter Solenoid and Related Circuits
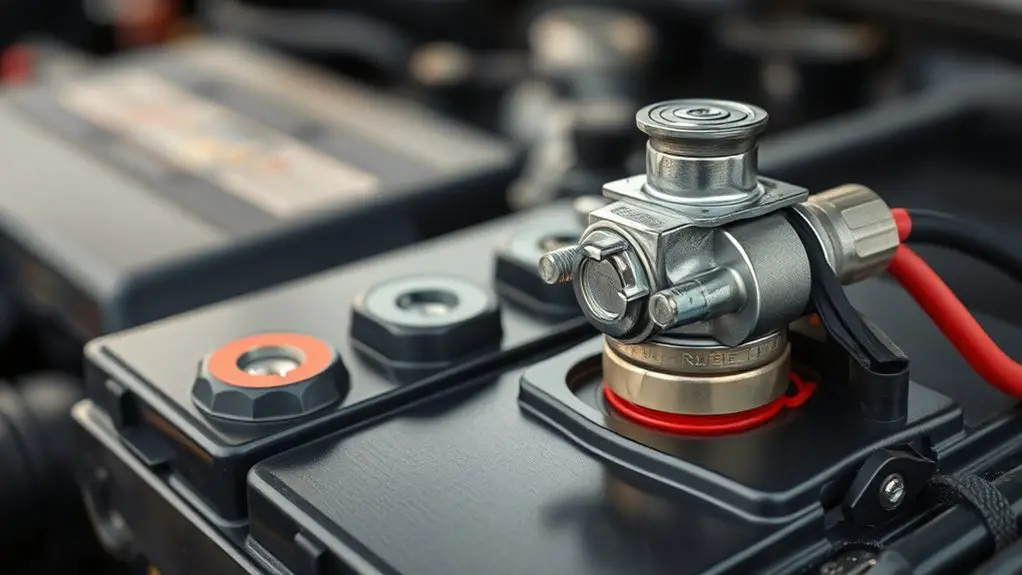
Inspecting the starter solenoid and related circuits requires a systematic check of the solenoid coil, its terminals, and the wiring harness. You’ll verify coil resistance, compare against spec sheets, and note any overheating signs or corrosion that could interrupt current flow. Inspect circuit connections at the battery, starter, and ignition switch for tightness and cleanliness; loose, bent, or frayed leads create parasitic paths that drain or misfire. Measure continuity between the solenoid’s control circuit and the start relay, ensuring the control signal engages fully without delay. Inspect the ground path from the engine block to the chassis; poor grounding mimics a weak supply, triggering repeated cranking or nonstart. Look for harness routing damage near heat sources or moving parts, which accelerates insulation wear. Document findings with concise notes. Prioritize restoration of solid, clean connections and proper insulation to support reliable operation, while noting any anomalies that warrant further diagnostic steps under circuit connections and solenoid performance.
Step-by-Step Fixes to Stop the Drain (DIY Approaches)
To stop the drain, start with a methodical set of DIY fixes that target the most common parasitic paths and startup loads.
- Inspect wiring harness integrity and clean battery terminals to reduce resistive losses, then verify connections with a battery current check during ignition off.
- Swap or reseat the starter solenoid connections; perform a live electrical troubleshooting pass to confirm the coil and contact pins aren’t arcing or tarnished.
- Implement a controlled load test on the ignition/starting circuit, ensuring no accessory drains remain energized when the key is off.
- Schedule regular solenoid maintenance, including relay and fuse verification, to prevent creeping parasitic draw and to preserve full cranking power.
These steps emphasize precise diagnostics over guesswork, reinforcing autonomy. You’ll build a reliable baseline, identify hidden loads, and keep the system ready for immediate startup.
When to Seek Professional Help for Starter Solenoid Issues
When should you call in a pro for starter solenoid issues? You should seek professional diagnostics when symptom recognition points to intermittent engagement, total failure to crank, or unusual electrical smells. If you consistently hear a click but the engine won’t start, or you notice parasitic drain persisting after DIY checks, a pro can verify circuits, harness integrity, and solenoid coil health with calibrated tools. Do not rely on guesswork for high-stakes starting systems; misdiagnosis can escalate battery damage or create safety risks. A professional assessment will verify the solenoid’s hydraulic/solenoid-to-starter engagement pattern, test resistance values, and inspect the ignition switch and ballast conditions. If diagnostics confirm a faulty solenoid or related harness, expect replacement with OEM standards or equivalent performance parts. In short, trusted diagnostics preserve freedom by preventing needless battery depletion and ensuring reliable startup.
| Symptom indicators | Diagnostic action |
|---|---|
| Intermittent engagement | Schedule testing |
| No crank despite battery | Electrical system check |
| Recurrent parasitic drain | Diagnostic current/ground tests |
| Visible damage | Inspect wiring/solenoid housing |
| Foul electrical odor | Immediate professional evaluation |
Prevention Tips to Keep Your Battery From Draining Again
Preventing future battery drain starts with solid habits and proactive checks that keep the charging system and parasitic loads in balance. You’ll adopt disciplined battery maintenance and uphold electrical hygiene to prevent repeat drain from creeping parasitic paths. Start with a baseline parasitic current check, then verify alternator output, charging voltage, and battery health under load. Regularly inspect wiring for corrosion, loose connectors, and insulation damage that can elevate draw. Schedule periodic load testing and guarantee components surface cleanly and securely engage. Maintain data-driven awareness of idle drains from modules or aftermarket accessories, isolating culprits with controlled disconnects. When in doubt, revert to standards that minimize risk: clean grounds, protected terminals, and proper fuse sizing. By sustaining these practices, you sustain reliability, performance, and freedom from unexpected stalling or downtime.
- Battery maintenance and electrical hygiene
- Systematic parasitic source isolation
- Clean, secure connections and grounds
- Proactive component health monitoring
Frequently Asked Questions
Can a Faulty Starter Solenoid Have Intermittent Drainage Symptoms?
Yes, a faulty starter solenoid can show intermittent drainage symptoms. You might notice sporadic cranks or intermittent no-start events that don’t follow a fixed pattern. For reliable conclusions, perform solenoid diagnostics with load testing, voltage drop checks, and ignition switch verification. Look for inconsistent current draw or sticking contacts. If symptoms appear only under load or after heat cycles, suspect internal arcing. Addressing linkage and wiring integrity helps prevent further parasitic drain.
Do Aftermarket Solenoids Differ in Parasitic Draw Risk?
Across aftermarket solenoids, reliability varies: about 15% of failures trace to parasitic draw, not actuation. Do aftermarket solenoids differ in parasitic draw risk? Yes, largely: some solenoid types use continuous coils or different latch designs that elevate idle draw. For you, consider aftermarket reliability data and compatibility with your starter. Choose proven solenoid types, verify current specs, and balance cost against long-term voltage stability to minimize parasitic loss while preserving performance.
Will Battery Desulfation Help After Parasitic Drain Occurs?
Will battery desulfation help after parasitic drain occurs? No, desulfation targets sulfated plates, not a discharged battery caused by parasitic drain. You should first isolate the parasitic load, restore voltage with a proper charger, and verify battery maintenance practices. If excessive drain recurs, replace faulty components and guarantee alternator health. Desulfation won’t recover lost capacity from a drained state, but good maintenance keeps you from repeat issues and preserves overall system reliability.
Can I Test a Solenoid Without Disconnecting the Battery?
A quick answer: yes, you can test a solenoid without disconnecting the battery, but proceed with caution. Use a multimeter to verify coil resistance and listen for a solid click when energizing via a fused test circuit. Employ solenoid testing methods that don’t load the system, and keep battery safety precautions at the forefront to avoid sparks. You’ll perform precise checks, then decide if replacement is needed for peak performance and freedom.
How Long Should a Parasitic Draw Last Before Replacement?
A parasitic draw should prompt replacement when its duration exceeds typical baseline for your system, usually after a few hours of inactivity or noticeable battery drain; prolonged draw indicates a faulty circuit or solenoid. Look for solenoid replacement indicators like sustained current beyond spec, buzzing, or heat. If you observe extended parasitic draw duration, replace the solenoid promptly to avoid drivetrain issues and guarantee reliable starting. Maintain records and verify with controlled tests before final replacement.