
Preventive Care to Stop Door Alignment Issue on the Bodywork
Preventive care starts with a data‑driven plan that tracks hinge wear, frame shifts, and seasonal changes to prevent gaps, rattles, and wind noise. Start with a baseline alignment, tighten hinge screws to spec, and use a feeler gauge to verify gaps stay within tolerance. Inspect weatherstrips for compression loss and debris, clean pivot points, and lubricate sparsely. Schedule regular lightweight checks and quarterly calibrations, adjusting for temperature swings—continue to improve your plan as you gather measurements. More tips follow if you keep reading.
Common Causes of Door Alignment Shifts
Several factors commonly cause door alignment shifts. You’ll notice movement stemming from structural flaws or environmental stressors that gradually alter hinge and frame relationships. Warping, sagging panels, or frame settlement can tilt the door plane, creating new contact points that nudge the latch and strike away from perfect alignment. Door sagging is a frequent culprit when gravity and prior impact combine with aging hardware, distorting alignment over time. Seasonal moisture shifts can swell or shrink wood components, subtly changing clearances and producing asymmetrical gaps. Ground movement or foundation settling also transmits to jambs, shifting hinge lines and inviting misalignment. Mislocated or worn hinge screws weaken support, amplifying small deviations into noticeable draft or binding. You should inspect for loose hardware, degraded weatherstripping, and uneven door compression. Early detection of door sagging and latch misalignment enables targeted corrections before gaps widen or seals fail, preserving function without excessive intervention.
How Loose Hinges Affect Door Gaps

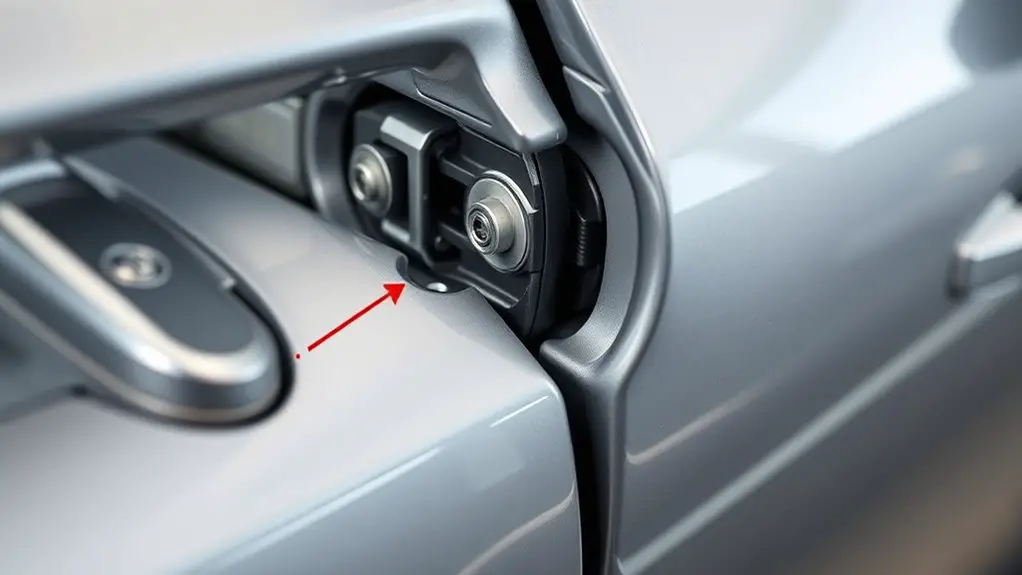
Loose hinges are a common, addressable cause of new door gaps. When hinges wear, door alignment shifts as pivot points loosen, altering door height, swing, and seal behavior. You’ll notice uneven gaps along the jamb, and potentially binding at top or bottom corners. Track hinge wear by measuring gaps consistently: use a thin ruler, record gap at multiple points, and compare to factory specs or prior measurements. If gaps exceed tolerance or vary with door position, service is warranted. Tightening screws without addressing wear may be temporary; replace worn hinges or pins to restore consistent gap measurement and return to stable alignment. Lubrication won’t fix wear-induced looseness, but it can reduce hinge noise during interim checks. Regular inspection guarantees you maintain balanced clamping force across hinges, preserving bodywork integrity and door closure reliability.
| Step | Action |
|---|---|
| 1 | Inspect hinge pins and screws |
| 2 | Measure multiple gaps |
Inspecting and Assessing Door Seals and Gaps
Inspecting door seals and gaps starts with a systematic check of both the perimeter weatherstripping and the visible gaps at the latch side. You’ll assess seal integrity by looking for compression loss, cracking, or deformation along the full door perimeter. Next, inspect mating surfaces for hardened adhesive, debris, or corrosion that could impair contact with the weatherstrip. Observe uniformity of contact as you close the door from several angles, noting any high spots or uneven seating. Conduct a controlled gap analysis by measuring daylight or using a feeler gauge at multiple points, documenting variations that exceed manufacturer tolerances. Record door closure behavior: latching ease, draft presence, and striker alignment. Evaluate door seal effectiveness in practical terms: resistance to airflow, moisture intrusion, and noise leakage. Compile findings into a concise report to guide targeted adjustments and maintain consistent door geometry, ensuring best seal performance and peace of mind.
Tools You Need for Basic Door Adjustments
To perform basic door adjustments, you’ll need a focused set of tools that accommodate common alignment issues identified after inspecting seals and gaps. Your kit should include a torque wrench, a trim tool set, plastic pry bars, a feeler gauge, and a straight edge to verify panel and hinge alignment without marring finishes. Add a mirror or small inspection light to confirm latch strike alignment and catch point travel. A door edge prying tool minimizes dent risk when adjusting hinges, while a rubber mallet allows precision nudges without deformation. For fast reference, carry a permanent marker for marking shim heights and alignment baselines. Use a torque wrench to set hinge screws to manufacturer specifications and a calibration block to validate door sag is within tolerance. This collection represents essential equipment for consistent results, enabling you to diagnose and correct misalignment efficiently while preserving bodywork integrity. door adjustment tools support repeatable, dependable outcomes.
Lubrication Practices for Smooth Closures
Lubrication practices for smooth closures focus on selecting the right lubricants and applying them correctly to hinges, latches, and weatherstripping so doors move quietly and seal consistently. You’ll choose lubrication types based on material compatibility, load, and exposure, prioritizing low dust and long-lasting protection. Avoid graphite on laminated surfaces and steer toward synthetic oils, lightweight greases, or dry films as appropriate. For hinges, you apply a thin, even coat along pivot points, then cycle the door to distribute evenly. Latches receive targeted drops or light sprays at latch mechanisms, guaranteeing smooth engagement without stickiness. Weatherstripping benefits from a flexible, low-friction layer that reduces squeak and wind noise while preserving seal integrity. Application techniques emphasize minimal residue, thorough wiping after service, and rechecking closures for uniform gaps. Routine checks should align with maintenance intervals, not over-lubricating, to prevent dirt buildup and guarantee consistent door operation.
Timing Your Adjustments for Optimal Fit
Timing your adjustments should align with predictable wear and clearance patterns to guarantee consistent door gaps. Consider Aligning Adjustment Timing, Optimize Fit Timing, and Schedule Adjustment Windows to match seasonal or usage-driven changes. You’ll establish a repeatable window for tweaks, reducing drift and preserving hardware longevity.
Aligning Adjustment Timing
Aligning adjustment timing matters because small timing errors can compound as doors age, creating friction, misalignment, and gaps. You’ll tune the process with deliberate cadence, focusing on repeatable steps and clear criteria.
- alignment techniques: Establish a baseline by verifying latch and hinge alignment, then adjust in small increments until panel gaps are uniform.
- adjustment frequency: Schedule checks after major temperature swings, seasonal use shifts, or bodywork, ensuring the fit stays within tolerance.
- verification cadence: After each adjustment, recheck door closure, strike alignment, and seal contact, documenting results for future reference.
Maintain consistent torque, avoid over-tightening, and record each parameter change to preserve repeatability and freedom in fit.
Optimize Fit Timing
Optimizing when you perform adjustments keeps fit stable as conditions shift. You’ll time actions around observable cues from fit assessment data, not guesswork. Begin with a baseline measurement of panel gaps, surface alignment, and latch engagement, then map how each variable responds to temperature, humidity, and load. Use precise adjustment techniques: micro-torquing fasteners, shimming where necessary, and verifying with repeatable cycles. Prioritize small, reversible changes and document each step, noting whether fit improves or deteriorates under load. Schedule checks after environmental shifts or vehicle movement to confirm stability, not to react to transient readings. Maintain a clear tolerance window and verify tools are calibrated. This disciplined cadence minimizes rework and supports a balanced, freedom-respecting design.
Schedule Adjustment Windows
Scheduling your adjustment windows around predictable cues helps maintain fit under changing conditions. You’ll time tweaks to seasonal shifts, humidity, and usage cycles, ensuring window frames stay aligned without overcorrection. Use precise cues from your alignment tools to avoid drift and preserve tailgate or hinge consistency as panels flex.
- Plan adjustments during stable ambient conditions to minimize material creep and fastener tension changes.
- Log cues from your alignment tools and weather data to create a repeatable schedule.
- Recheck after heavy use or disturbances to confirm the fit remains true without unnecessary rework.
Preventive Measures to Reduce Wind Noise
Wind noise often stems from small gaps or misalignments around doors; addressing these proactively reduces turbulence and improves overall seal performance. You’ll target perimeter gaps with precise measurements, applying uniform pressure across weather-strips to guarantee consistent compression. Focus on hinge-to-panel interfaces, latch alignment, and striker spacing, since these zones frequently channel wind around the bodywork. Implement aerodynamic seals that maintain flexibility at temperature extremes, avoiding hard stops that invite flutter. For wind noise reduction, select soundproofing materials rated for automotive use, combining economical foams with low-density barrier layers to disrupt audible resonance without adding bulk. Correct installation is essential: clean surfaces, compatible adhesives, and controlled curing prevent delamination. Verify by simulating driving conditions, monitoring for tonal changes across speed bands. Maintain a clean, debris-free gap profile to preserve performance. Your goal is a quiet, freedom-driven ride, balancing efficiency, durability, and acoustic clarity.
Maintenance Schedule for Long-Term Alignment Health
Set up a regular inspection cadence to catch misalignment early and document findings for trend analysis. Schedule seasonal alignment checks to account for thermal and load changes, and adjust tolerances accordingly. Implement a proactive lubrication plan that aligns with the inspection cycle to minimize wear and sustain long-term alignment health.
Regular Inspection Cadence
Establish a clear inspection cadence to maintain long-term door alignment health: perform lightweight checks at monthly intervals and more thorough calibrations quarterly, with a documented log to track wear, gaps, and hinge or track deviations.
- 1) Regular check ups: confirm latching consistency, measure gaps, and note any drift in alignment.
- 2) Inspection frequency: adhere to the monthly lightweight and quarterly deep assessments, updating the log immediately after each visit.
- 3) Documentation discipline: log results, actions taken, and residual tolerance, enabling trend analysis and proactive adjustments.
This cadence guarantees predictable maintenance, minimizes snag risks, and preserves bodywork symmetry while supporting a freedom-driven approach to long-term alignment health.
Seasonal Alignment Checks
Seasonal alignment checks should be integrated into your maintenance cycle to address year‑to‑year stresses and temperature-driven drift; perform targeted evaluations at seasonal changes to capture predictable shifts in gaps, hinge wear, and track alignment. You’ll schedule brief diagnostic sessions during spring and autumn, focusing on door sag, latch engagement, and door panel gaps. Use a standardized checklist for repeatability, documenting measurements and observed deviations. Treat seasonal checkups as a probabilistic forecast, not a reactionary fix, to preserve hinge stability and frame integrity. Prioritize alignment maintenance tasks that prevent compound wear and misalignment drift over time. Maintain clear records to track trends, validate adjustments, and inform long‑term health planning. You’ll protect aesthetics, function, and freedom of operation through disciplined, precise monitoring.
Proactive Lubrication Schedule
Proactive lubrication schedules are essential for long-term alignment health, ensuring hinge pins, tracks, and latch mechanisms operate smoothly under varying loads and temperatures.
You implement a preventive maintenance mindset by selecting appropriate lubrication techniques and applying them consistently. This minimizes metal-to-metal wear and preserves door geometry, reducing misalignment risk over time.
- Inspect and clean pivot points, then apply the recommended lubricant in thin, even coats.
- Record intervals, materials, and environmental conditions to inform future lubrication cycles.
- Verify function after each application, noting any stiffness, binding, or irregular noises for corrective action.
This approach balances reliability with autonomy, empowering you to sustain ideal door alignment without over-maintenance.
Frequently Asked Questions
Can Door Alignment Issues Occur Due to Environmental Temperature Changes?
Door alignment issues can arise from temperature fluctuation effects, yes, as metals expand and contract with heat and cold. When you’re in a climate with rapid swings, you’ll notice gaps or binding. I’ve seen a trunk seal tighten after a cold night, then loosen by afternoon. Rely on seasonal alignment adjustments, monitor for sticking, and adjust hinges or latch gaps accordingly. You’ll gain smoother operation and long-term resilience with proactive checks and precise tolerances.
Do Aftermarket Alarms Affect Door Gap Measurements and Alignment?
Yes, aftermarket alarms can affect door gap measurements and alignment. When you install an alarm, components like sensors, brackets, and wiring can shift trim panels or tweak hinge tolerances if not mounted correctly. To protect alignment, use proper mounting points, route cables cleanly, and recheck gaps after installation. Choose alarm installation with minimal intrusion and verify security features don’t press on the door frame. Maintain precise tolerances for ideal fit and function.
How Often Should Bodywork Coatings Influence Door Support Inspections?
Inspections should occur on a regular cadence aligned with coating durability, ideally with every major service interval. You should track bodywork inspections as part of your maintenance plan, adjusting frequency based on coating wear, exposure, and usage. You’ll want to verify door support integrity alongside coatings, titrating intervals to real-world conditions. Maintain a disciplined, repeatable process, emphasize precision, and confirm your checks reflect ongoing coating durability and structural robustness.
Can Paint Thickness Variations Mask or Worsen Misalignment Symptoms?
Yes, paint thickness variations can mask alignment symptoms by adding apparent spacer material, or worsen them if excess paint alters panel geometry. You’ll want to measure real gaps and not rely on visual cues alone. When you assess, check for consistency across edges, then correlate with door shims and hinges. If paint is uneven, consider a controlled repaint to restore true alignment, ensuring paint thickness is uniform and within spec.
Do Factory Warranty Terms Cover Minor Door Realignment Repairs After Assembly?
Factory warranty terms vary, but typically minor repairs like door realignment after assembly are covered if the issue isn’t caused by user damage. You should review the warranty document for exclusions and notice periods. If the misalignment appeared soon after delivery, you’ll likely qualify for factory warranty and minor repairs at no cost. Contact your dealer with evidence of the defect, request a formal assessment, and document all communications for possible future claims.